While Working your WordPress website or blog you may face this error “sorry you are not allowed to access this page”. There may be many reasons you see this error while working on the WordPress admin dashboard.
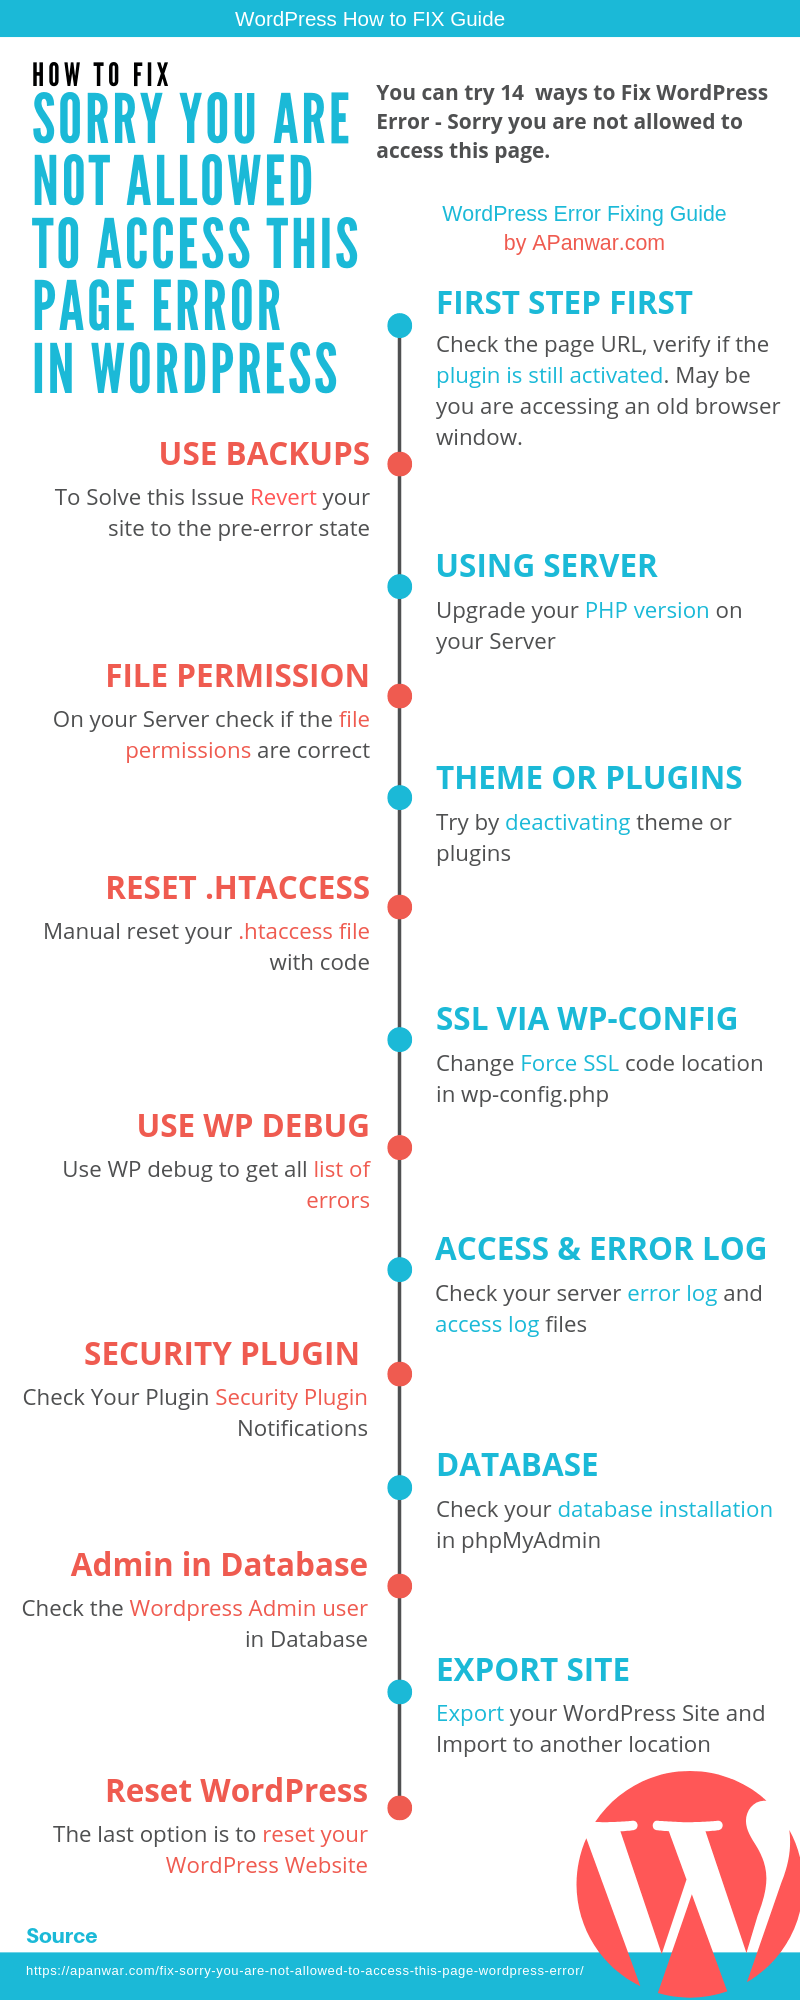
There are more than 13 ways to Fix ‘Sorry you are not allowed to access this page’ WordPress error and here is the list-
First Step First
1. Check the page URL, verify if the plugin is activated
Use backups to Solve this Issue
2 Revert your site to the pre-error state
Using Server Access
FTP or Cpanel File Manager
4. Check your file permission
5. By deactivating theme or plugins
6. Manual reset your .htaccess file
7. Forcing SSL via wp-config.php
Code Debugging
8. Use WP debug to get all list of errors
9. Review your access and error log
10. Retrieve plugin security notifications
Database phpMyAdmin Editing to Access Admin Area
11. Check the database prefix
12. Database admin privileges
Last and Final Step to Fix this Error
13. Export all and import your WordPress site
14. Reset WordPress
Always do the backup before the proceedings
Important- Before diving into the deep sea I recommend you to make a backup of your site. So that at least you can restore your site and can start to troubleshoot again if things get worst.
Note
This error may occur if you just migrate to a live site from localhost or staging server. In this case, the wp-admin area will not be accessible, but you will be able to access the front end of the website. So jump to step 10 if you have newly migrated your site and facing the same error message.
Things to Know
When you see Sorry you are not allowed to access this page error in the WordPress admin area, it means that now you will not be to access anything in your dashboard so you can not make any changes or editing there. I suggest you please get some ideas about Cpanel file manager or FTP, about how to use them or how to access files there. Because this is the option left and you will be using FTP ( File Transfer Protocol) or CPanel file manager in the given below steps to resolve the issue. Some of the steps also related to the database so you should also have some insights about it.
Let us start the detailed explanation to solve Sorry you are not allowed to access this page WordPress admin error
1. Check the Page URL and Verify if the Plugin is Activated
The first step first. If you have opened the WordPress admin dashboard pages in many browser windows or tabs, and you accidentally or knowingly disable any plugin which was already opened in the browser. This will turn in to “Sorry you are not allowed to access this page” when you will refresh or try to make any change on that page.
It is very clear that the plugin was activated so you were able to access its settings and options, but when you deactivate the plugin, you will not be able to access the same, because now it is set to disable. So make sure that the plugin is activated which URL you are trying to access.
2. Revert to an Older State
Always better to make a backup copy of the website before you make any changes or you can also ask the hosting provider if they have any backup of your website. Most of the hosting providers do automated backups.
But if you missed the backup part you should try to recall the last step you performed on your website. Because of that step this error is showing.
So if you got the idea what you did just revert it. The last change that you made on the website may be anything like – installing or updating the plugin or theme, migrating from another server or localhost or editing any WordPress file. After reverting your last change the site will work fine.
3. Upgrade Your PHP Version
“Sorry you are not allowed to access this page” can also arise due to incompatibility between PHP and your WordPress installation. Most of the time we see the notice on the WordPress admin dashboard that WordPress core has some updates and we do it. With every update, WordPress core would get some security fixes or maybe it will introduce some new features. But those updated versions also require the updated version of PHP. WordPress is written in PHP, so PHP should also be updated accordingly if needed.
Before upgrading PHP, you should do the staging so that you can have the backup and can also test your old site if needed at a later stage.
The latest WordPress version released on May 21, 2019, is 5.2.1 and it requires a PHP version of 7.3 or greater, MySQL version 5.6 or greater OR MariaDB version 10.1 or greater and HTTPS support.
You should log in to your Cpanel and Select “PHP Version”, there you will be able to select your PHP version. Or you can simply ask your hosting providers to upgrade the PHP version if this is tricky for you.
Here is a complete guide about PHP and its versions.
4. Check Your File Permission
“Sorry, you are not allowed to access this page” can be also occurred due to incorrect file permissions. Folder permission is set to 755 permissions and file permission is set to 644. To check and change your files or folders permission,s you should have access to FTP or Cpanel. For security reasons, it may be possible that your .htaccess and wp-config.php files set to 444, it is fine no need to worry about it.
5. Deactivate Themes or Plugins
If you see this notice “Sorry, you are not allowed to access this page” after activating a new theme or plugin. Simply deactivate that plugin or theme. You can use use the FTP or Cpanel to deactivate them. Simply go to public_html/themes/themename and rename “themename” to something else and it will be deactivated. You can do the same for plugins. This situation may also arise after updating the same, so you can repeat the steps and download the older version of WordPress themes or WordPress plugins. You should ask the seller if you have installed any premium themes or plugins.
6. Manual Reset your .htaccess File
.htaccess file, This may be new to you, but every WordPress user should familiar with this file. This is a configuration file that is used on web servers. This file can be used to change the webserver configuration, enable or disable additional functionality.
- Know How To Fix White Screen Of Death In WordPress
- How To Solve Fatal Error Allowed Memory Size Of 1234567 Bytes Exhausted?
- How to Fix: Error Establishing Database Connection in WordPress
- How to Fix Connection Timed Out In WordPress Site
- How To Fix Internal Server Error 500 In WordPress Full Step By Step Guide!
- How To Fix Warning: Cannot Modify Header Information Error In WordPress!
Explore More
There can be separate .htaccess file for each folder on the server. But there will be one .htaccess file inside public_html. .htaccess is a hidden file. [ in Linux every file or folder forwarded by a “.” will be a hidden file or folder]. So you should Enable to view hidden files and folders and then you will be able to see it. If there is no .htaccess file present there you can create a new one.
When we use WordPress there is a fixed set of code for this file, which should be written there. There may be other codes too, but it is essential.
Here the code
# BEGIN WordPress

RewriteEngine On

RewriteBase /

RewriteRule ^index\.php$ - [L]

RewriteCond %{REQUEST_FILENAME} !-f

RewriteCond %{REQUEST_FILENAME} !-d

RewriteRule . /index.php [L]

# END WordPress
Simply place this code in the .htaccess file and save it. Your .htacces file may be altered by plugins or themes. No need to worry some of them can do it, especially security plugins. So your .htaccess file should be ok after placing the given code.
Note- You should also take a backup of your old .htacess file if exists there.
7. Forcing SSL via wp-coinfig.php
This is one of the most important files of self-hosted WordPress installation. This file contains the WordPress configuration details. Generally while editing the wp-config.php file it is not suggested to write any code after
/* That's all, stop editing! Happy blogging. */ So we choose any place between and above this line and place our code there.
You may be using this piece of code in your wp-config.ph file for some reasons, especially for https redirection
define('FORCE_SSL_ADMIN', true);

if ($_SERVER['HTTP_X_FORWARDED_PROTO'] == 'https')

$_SERVER['HTTPS']='on';
Although it is not the wrong code and also not the wrong file to write this code. And as per WordPress guidance, you can write it anywhere in wp-config above /* That's all, stop editing! Happy blogging. */. . BUT while using this code
define('FORCE_SSL_ADMIN', true);

if ($_SERVER['HTTP_X_FORWARDED_PROTO'] == 'https')

$_SERVER['HTTPS']='on';
You should place it at the beginning wp-config.php file just after opening the PHP language tag that is ?>.
8. Use WP debug to get a List of Errors
A WordPress user should be aware of which code should be used where. Generally, there are 2 files that we edit. The first one if wp-config.php and the second one is the functions.php file of your currently active theme. To make WordPress errors visible you should place the code define ( 'WP_DEBUG', true ); in your wp-config.php file. [you should have FTP or Filemanager access to edit this file. You can not access this file from your WordPress dashboard.
WP_DEBUG is a PHP constant (a permanent global variable) that can be used to trigger the “debug” mode throughout WordPress. It’s assumed to be false by default and usually set to true in the wp-config.php file if needed.
After enabling WP_DEBUG you will be able to see all PHP errors, notices, and warnings on your website. Now you can see all PHP notices and warnings which do not follow proper data validation conventions inside PHP. But it doesn’t always mean that this code is broken. So now you have an insight and you can see where the problem is.
Note- making WP_DEBUG true will also autogenerate an error log file, which can be accessed either at the root public_html or in the wp-content folder.
9. Review your Access and Error Log
In an earlier step, you have checked your WordPress error log if you didn’t get enough information there and the WordPress still showing “Sorry, you are not allowed to access this page”. You should access your server error log. You can use the .htaccess file to generate extra server error logs. you should place this code in your .htacess file php_flag log_errors on.
After placing this you should also add the error log file location, and this is the code php_value error_log /home/USERNAME/public_html/error_log.txt . After setting this all the website errors will be logged in to error_log.txt file which will be located in the public_html directory.
Note – you should access or browse your site so that the errors can be logged in to log files.
10. Retrieve Plugin Security Notifications
You have completed the 9 steps to solve the issue- Sorry you are not allowed to access this page. If you didn’t get any success till now. There may be chances that your site is hacked. Hacking doesn’t mean that there will be an ugly HaCkEd message on your site or it will be blank. But there are some silent hackers too, they just got access to your site and modify or change some settings there and leave the whole site as it is. And this may be difficult to find these types of hacking traces.
If you have already installed any security plugin, you should access its log file. Security plugins also send messages to the site’s administrator about malicious or suspicious activity and website security issues. So you should check your Inbox and also spam folder [some times malis got by spam folder if there will be repeated too many emails]
If you find any trace about hacking, you should fix your site and remove all the ugly code placed by hackers.
11. Database
This error message may also occur if you are running many WordPress sites using the same phpMyAdmin with all installation have the same table prefix. It generally happened if you have developed your site on localhost and migrated it to a live website. It is better to use different table prefixes for every installation. By doing this you can also easily recognize your WordPress blogs database.
To check your current database name and table prefix you should open and edit the wp-config.php file. Check carefully and make sure you are using the right database and table prefix.
Now you have the right database and table prefix. There may still chance of showing the same error again. So you should also verify _usermeta table and _options table. These both tables may have references to the old prefix in meta keys.
_usermeta table may have references to the old prefix in meta_key column
_options table may have the reference in option_name column (_user_roles)
Replacing old prefixes with the correct ones will resolve the issue.
12. Database Admin Privileges
You may be wondering, you haven’t made any changes to the database but my next point is again about the database. Actually, WordPress is a CMS ( content management system) and it uses the database to store content and customizations. So you should make sure that the database is working fine.
WordPress has six pre-defined roles: Super Admin, Administrator, Editor, Author, Contributor and Subscriber, and each role is allowed to perform a set of tasks called Capabilities. Super admin is related to a network site, so you haven’t any need to think about it if your WordPress not using the multisite installation.
Here is a complete guide on WordPress user role.
Administrator
is the highest in priority for a normal WordPress install and has all the rights. While installing WordPress the first user has by default administrator capabilities. If there will be an improper user capability that could be resulting in “Sorry you are not allowed to access this page”. It is important that the user should have administrator capabilities to make changes on-site and to access the WordPress dashboard with all features.
I assume you are not a super freak and can not check and verify your WordPress users table in the database. So I suggest you place this code in your current active theme’s functions.php file. Use FTP or Cpanel filemanager to edit this file. The location will be public_html/themes/themefolder/functions.php. “themefolder” will be the name of your theme folders name. By using this you will create a new user with administrator capabilities. Do not worry about your old user, posts, and pages or your media all those will be safe and will not be removed from there. This code will only create a new admin user and you can have access to your dashboard again.
Note-
You should change the admin username, password, and email as per your need and actual. Also, use a new and unique mail id and username, if you will use the existing username or email id, it will not work.
Here is the code-
function create_admin_account(){

$user = 'Username';

$pass = 'Password';

$email = 'email@domain.com';

//if a username with the email ID does not exist, create a new user account

if ( !username_exists( $user ) && !email_exists( $email ) ) {

$user_id = wp_create_user( $user, $pass, $email );

$user = new WP_User( $user_id );

//Set the new user as a Admin

$user->set_role( 'administrator' );

} }

add_action('init','admin_account');
Just save the functions.php file and navigate to login window at https://yoursitename.com/wp-login.php and use the newly used credentials AND ITS ALL SET.
Last and final options to resolve WordPress Sorry you are not allowed to access this page error
13. Export your WordPress Site
If you have not any coding skills or do not want to waste your time, you can also export your site content. It will include everything like your posts pages comments etc. After exporting you can import this to your new fresh WordPress installation. Using this you can eliminate all the troublesome steps. To do this step you can use the Export option under Tools menu. Or you can also use other plugins.
Note –
You should not remove the existing installation or your import will not work properly. Once all import completed and after verifying all content and images you can make the decision about old installation.
14. Reset WordPress
Alternatively, you can also reset the WordPress. This is again the last option if none of the above work. After doing this your whole WordPress will be reset to default. You should move to this step carefully as you will lose all of your content. To accomplish this simply changes the table prefix in wp-config.php. This will create the new tables in the database and the old one will also stay there.
OR you can also remove the database tables from phpMyadmin. I warn you again that please move carefully to this step as it will rest the whole WordPress.
You are reading this article because you may face the same error “Sorry you are not allowed to access this page” while working on your WordPress site.
I have covered the most possible solution in this article to solve admin error in WordPress Sorry you are not allowed to access this page. I hope you will be able to solve your WordPress admin problem by following the above-given steps.
If you have any extra solution or have questions, please feel free to share your experience using the comments below. I am also interested to know which one works for you.