Contact Form 7 is one of the most popular plugins in WordPress. It is very easy to use. In this article, I will show you how you can use Contact Form 7 plugin on your WordPress websites or blog.

These are the topics that I will cover related to contact form7 and how to use it in WordPress.
How to Install Contact Form 7
Display Contact Form 7 on Your Website
Contact Form 7 Form Fields Overview
Contact Form 7 Form Fields Explanations
Add a New Form Field in Contact Form 7 Form
Contact Form 7 Placeholder and icons
Contact Form 7 Email Validation
How to install contact form 7
1. log into the WordPress Admin Dashboard
2. Navigate to Plugins → Add New and then type “Contact Form 7” in the search box.
3. Once found, click on install and activate the plugin by clicking on Install → then Activate. As shown in the image below.

How to display contact form 7 on your website
To display a form on your site, on the left side of your WordPress dashboard, open Contact → Contact Forms. Now here you can manage multiple forms from this location.
A contact form is already available for immediate use, it is a default form provided by the contact form7 plugin. Right next to the name Contact form 1, you can see the shortcode
Error: Contact form not found.
. In your case, the id=”xxx” maybe something else. Copy this shortcode and paste it anywhere on your site where you want to show the contact form. Suppose you want to use contact form on Contact Us Page, So edit the page and paste the code.
Paste Shortcode in your Contact Page Like below:

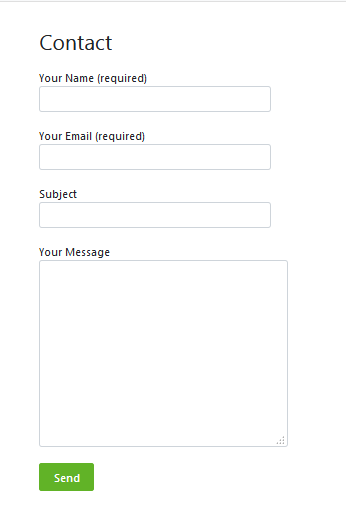
How it will look on your site?
After pasting the shortcode, Hit the Update button and save the page. Now you can view the Contact Us page to see the contact form and here it will look like. The look may be different on your site. because of your current theme styling.
Contact Form 7 Form Fields Overview
Ok so now you have a very basic contact form live on your site. I am sure you may need some other fields too like phone number some drop down boxes to choose or maybe something else as per your requirements. So here is a list of 14 fields that contact form7 support bt default.
1) text
2) email
3) URL
4) tel
5) number
6) date
7) text area
8) drop-down menu
9) checkboxes
10) radio buttons
11) acceptance
12) quiz
13) file
14) submit
Contact Form 7 Form Field Explanations
1) TEXT: This is the text field. You can add First name, Last name, name, place, etc for simple input.
2) EMAIL: This field is used for Email Id only.
3) URL: This field is used for the Website URL.
4) TEL: This field is used for a Telephone number only. You can add a number only here.
5) NUMBER: In this field, there are two options i.e Spinbox and slider. See below:

You need to add a range for this field like 0 to 9, 0 to 1000, etc.

- 8 Best WordPress Security Plugins to Secure Your WordPress Site
- WordPress Dashboard Overview For New Bloggers in 2024
- WordPress.com vs WordPress.org which one is better? Fully Explained!
- How to Install WordPress on Bluehost
- Contact Form 7 Basic Things you Should Know
Explore More
6) DATE: This field is used for the date. You can also add a range for this.
7) TEXT AREA: This field is used for messages, comments, bio, etc.
8) DROP-DOWN MENU: This field is used to select. Like Choose your country, Choose any number, etc.
9) CHECKBOX: This field is used to select more than one option. Like Choose your subject-math, English, chemistry, etc
10) RADIO BUTTON: This field is select only one option. Like Gender etc
11) ACCEPTANCE: This is used for confirmation of the user. Like term and conditions
12) QUIZ: This is used for the quiz. You can add a question and answer here.
13) FILE: This is used for upload files. Like, upload your resume, etc.
14) Submit: This is submitting a button. You can use SEND, CLICK, etc
How to add a new form field
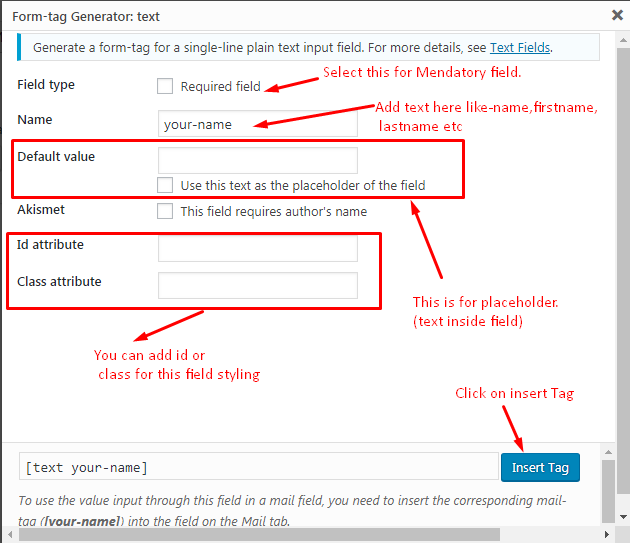
1) Click on the field name. Then a popup will be opened. After that fill the given options then click on Insert tag. See below:
You can add any fields that you want. Like below:

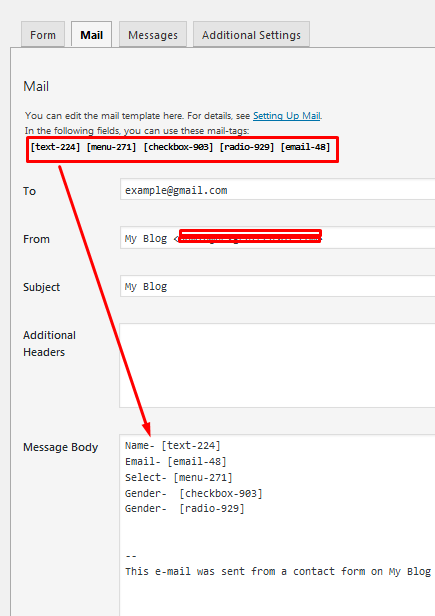
2) Add inserted tag also in the message body like below. The message body is the set of text which will be sent to the site owner.
3) Check the preview:

How to use Placeholder and icons in the Contact Form7 Plugin?
Now you know how to add extra form fields. And now you need some fancy look there? am I right? Ok, so its time to add some icons and labels to the contact form 7.
First of all, you need to install this plugin, it is free. Install Cf7 Icons and Labels plugin in your WordPress dashboard and activate it. This plugin can be used to add font-awesome icons and labels to Contact Form 7. This is very easy to use. Let’s do it-
Go to your Dashboard and search “Cf7 Icons”. Like below Screenshot:
![]()
Then Install and Activate it.
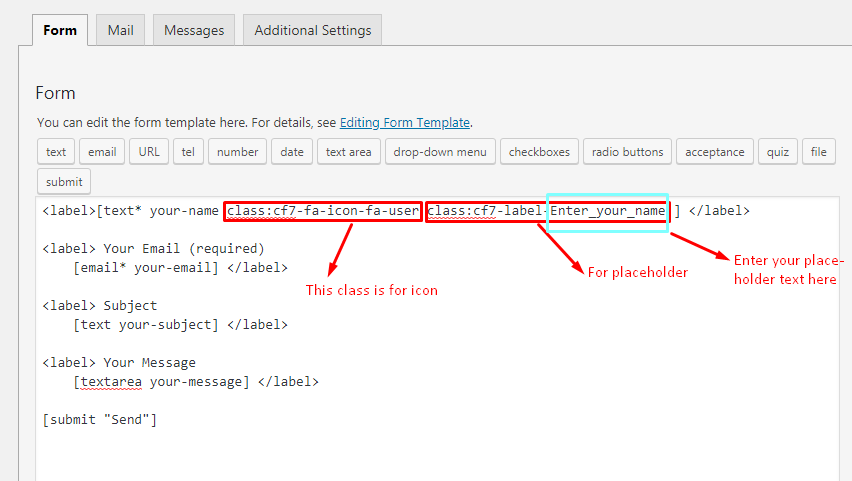
After activating the CF7 icons and labels plugin, Edit your contact form and then add a class for icon and placeholder. Here is an example, to add place holder and icon or Name field
“class:cf7-fa-icon-fa-user class:cf7-label-full_name”. See below Screenshot:
I have used an example only. You can get more icons from here: https://fontawesome.com/v4.7.0/cheatsheet/

Now Check the preview of the contact form after adding labels and icons
![]()
How to use Contact Form 7 Email Validation
Contact form7 email validation is a very useful plugin. It accepts only valid emails like helloworld@mail.com etc. This plugin, do not accept any spam email. This plugin adds a customized functionality to add an email field validation checkpoint to the popular Contact Form7 plugin. A DNS verification validation is used to verify an email address from a valid domain.
When anybody adds invalid email id then it will display error “Email address entered is not valid, DNS resolution failed”. So by this, a real address goes through without any issue.
Installation Steps:
1) Go to the admin dashboard- Add new plugin – search for “Contact Form 7 Email Validation”.
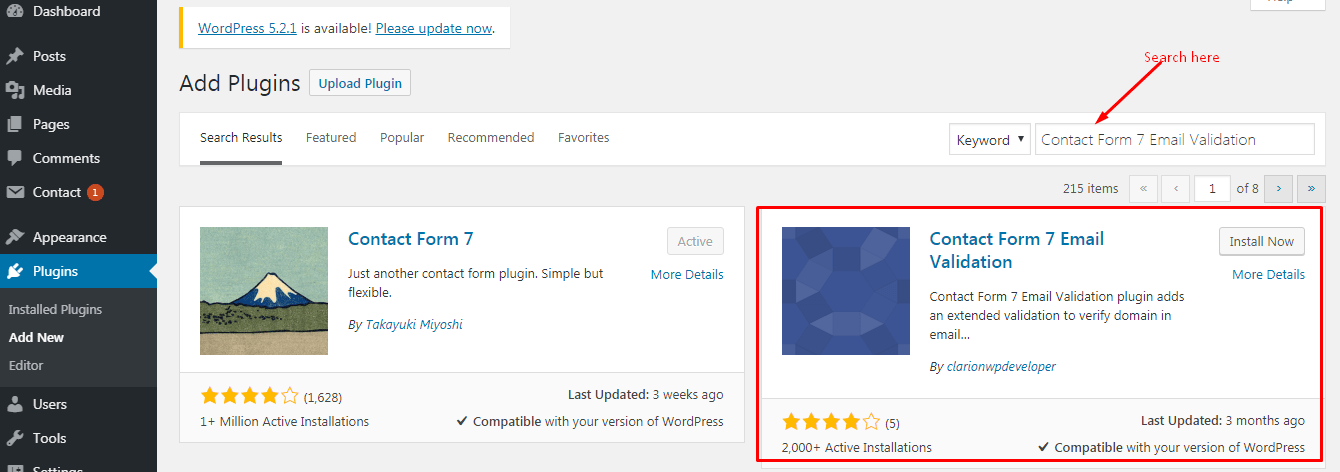
2) Install and activate the plugin. Now have a look on the screenshot, it will show an error message if anybody will enter a wrong or non-existed mail id.

Now you can check your contact form output. It is very easy to use, you don’t need to add any shortcode or any setting. Just install and activate it. I hope this article is useful to you. Please comment and ask if any doubt.